


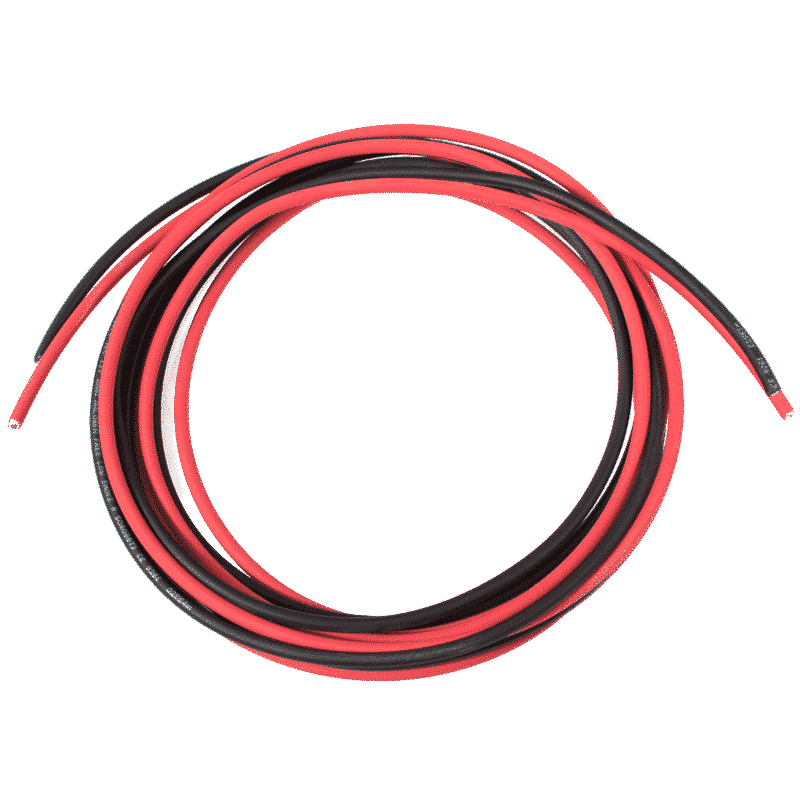
Solar cable
SKU: 804€1.07 – €811.00Price range: €1.07 through €811.00 (0% BTW)
Solar cable is used to connect solar panels to the inverter. The cable has a UV-resistant sheath, so it stands up well to outdoor weather conditions.
Please note! The cable is available per metre. Choose 1 m and then enter the number of metres you want as the quantity (we will supply this as one continuous length, so you will not receive lots of separate 1 m pieces).
If you choose 100 metres or 500 metres, you will receive the cable on a reel in one continuous length.
MPN: 738613@0500
This version is currently unavailable new. These items are ready to ship.
 4 metres Rood, 4 mm2, CCA cut length 299€4.32 instead of €4.80 new -10%
-
1,5 metres Rood, 4 mm2, DCA cut length 150€1.44 instead of €1.61 new -11%
-
1,5 metres Rood, 6 mm2, CCA cut length 125€2.28 instead of €2.54 new -10%
-
3 metres Rood, 6 mm2, CCA cut length 127€4.56 instead of €5.07 new -10%
-
4 metres Rood, 6 mm2, CCA cut length 119€6.08 instead of €6.76 new -10%
-
4,5 metres Rood, 6 mm2, CCA cut length 128€6.84 instead of €7.60 new -10%
-
2 metres Rood, 6 mm2, DCA cut length 141€2.63 instead of €2.92 new -10%
-
2 metres Rood, 6 mm2, DCA cut length 142€2.63 instead of €2.92 new -10%
-
2 metres Rood, 6 mm2, DCA cut length 145€2.63 instead of €2.92 new -10%
-
2 metres Rood, 6 mm2, DCA cut length 147€2.63 instead of €2.92 new -10%
-
1 metres Zwart, 4 mm2, DCA cut length 163€0.96 instead of €1.07 new -10%
-
1,5 metres Zwart, 4 mm2, DCA cut length 164€1.44 instead of €1.61 new -11%
-
4,5 metres Zwart, 4 mm2, DCA cut length 169€4.33 instead of €4.82 new -10%
-
57 metres Zwart, 4 mm2, DCA cut length 171€54.89 instead of €60.99 new -10%
-
57 metres Zwart, 4 mm2, DCA cut length 172€54.89 instead of €60.99 new -10%
-
3,5 metres Zwart, 6 mm2, DCA cut length 187€4.60 instead of €5.11 new -10%
-
4,5 metres Zwart, 6 mm2, DCA cut length 133€5.91 instead of €6.57 new -10%
-
5 metres Zwart, 6 mm2, DCA cut length 182€6.57 instead of €7.30 new -10%
-
5 metres Zwart, 6 mm2, DCA cut length 185€6.57 instead of €7.30 new -10%
-
5 metres Zwart, 6 mm2, DCA cut length 228€6.57 instead of €7.30 new -10%
-
5 metres Zwart, 6 mm2, DCA cut length 230€6.57 instead of €7.30 new -10%
-
5 metres Zwart, 6 mm2, DCA cut length 231€6.57 instead of €7.30 new -10%
-
5 metres Zwart, 6 mm2, DCA cut length 232€6.57 instead of €7.30 new -10%
-
5 metres Zwart, 6 mm2, DCA cut length 233€6.57 instead of €7.30 new -10%
-
5 metres Zwart, 6 mm2, DCA cut length 234€6.57 instead of €7.30 new -10%
-
5 metres Zwart, 6 mm2, DCA cut length 236€6.57 instead of €7.30 new -10%
-
5 metres Zwart, 6 mm2, DCA cut length 237€6.57 instead of €7.30 new -10%
-
5 metres Zwart, 6 mm2, DCA cut length 238€6.57 instead of €7.30 new -10%
-
5 metres Zwart, 6 mm2, DCA cut length 239€6.57 instead of €7.30 new -10%
-
5 metres Zwart, 6 mm2, DCA cut length 240€6.57 instead of €7.30 new -10%
-
5 metres Zwart, 6 mm2, DCA cut length 241€6.57 instead of €7.30 new -10%
-
5 metres Zwart, 6 mm2, DCA cut length 242€6.57 instead of €7.30 new -10%
-
5 metres Zwart, 6 mm2, DCA cut length 243€6.57 instead of €7.30 new -10%
-
5 metres Zwart, 6 mm2, DCA cut length 244€6.57 instead of €7.30 new -10%
-
5 metres Zwart, 6 mm2, DCA cut length 245€6.57 instead of €7.30 new -10%
-
5 metres Zwart, 6 mm2, DCA cut length 246€6.57 instead of €7.30 new -10%
-
5 metres Zwart, 6 mm2, DCA cut length 247€6.57 instead of €7.30 new -10%
-
5 metres Zwart, 6 mm2, DCA cut length 248€6.57 instead of €7.30 new -10%
-
5 metres Zwart, 6 mm2, DCA cut length 249€6.57 instead of €7.30 new -10%
-
5 metres Zwart, 6 mm2, DCA cut length 250€6.57 instead of €7.30 new -10%
-
5 metres Zwart, 6 mm2, DCA cut length 251€6.57 instead of €7.30 new -10%
-
5 metres Zwart, 6 mm2, DCA cut length 252€6.57 instead of €7.30 new -10%
-
5 metres Zwart, 6 mm2, DCA cut length 253€6.57 instead of €7.30 new -10%
-
5 metres Zwart, 6 mm2, DCA cut length 254€6.57 instead of €7.30 new -10%
-
5 metres Zwart, 6 mm2, DCA cut length 255€6.57 instead of €7.30 new -10%
-
5 metres Zwart, 6 mm2, DCA cut length 256€6.57 instead of €7.30 new -10%
-
5 metres Zwart, 6 mm2, DCA cut length 257€6.57 instead of €7.30 new -10%
-
5 metres Zwart, 6 mm2, DCA cut length 258€6.57 instead of €7.30 new -10%
-
5 metres Zwart, 6 mm2, DCA cut length 259€6.57 instead of €7.30 new -10%
-
5 metres Zwart, 6 mm2, DCA cut length 260€6.57 instead of €7.30 new -10%
-
5 metres Zwart, 6 mm2, DCA cut length 261€6.57 instead of €7.30 new -10%
-
5 metres Zwart, 6 mm2, DCA cut length 262€6.57 instead of €7.30 new -10%
-
5 metres Zwart, 6 mm2, DCA cut length 263€6.57 instead of €7.30 new -10%
-
5 metres Zwart, 6 mm2, DCA cut length 264€6.57 instead of €7.30 new -10%
-
5 metres Zwart, 6 mm2, DCA cut length 265€6.57 instead of €7.30 new -10%
-
5 metres Zwart, 6 mm2, DCA cut length 266€6.57 instead of €7.30 new -10%
-
5 metres Zwart, 6 mm2, DCA cut length 267€6.57 instead of €7.30 new -10%
-
5 metres Zwart, 6 mm2, DCA cut length 268€6.57 instead of €7.30 new -10%
-
5 metres Zwart, 6 mm2, DCA cut length 270€6.57 instead of €7.30 new -10%
-
5 metres Zwart, 6 mm2, DCA cut length 271€6.57 instead of €7.30 new -10%
-
5 metres Zwart, 6 mm2, DCA cut length 272€6.57 instead of €7.30 new -10%
-
5 metres Zwart, 6 mm2, DCA cut length 273€6.57 instead of €7.30 new -10%
-
5 metres Zwart, 6 mm2, DCA cut length 274€6.57 instead of €7.30 new -10%
-
5 metres Zwart, 6 mm2, DCA cut length 275€6.57 instead of €7.30 new -10%
-
5 metres Zwart, 6 mm2, DCA cut length 276€6.57 instead of €7.30 new -10%
-
5 metres Zwart, 6 mm2, DCA cut length 277€6.57 instead of €7.30 new -10%
-
5 metres Zwart, 6 mm2, DCA cut length 278€6.57 instead of €7.30 new -10%
-
5 metres Zwart, 6 mm2, DCA cut length 279€6.57 instead of €7.30 new -10%
-
5 metres Zwart, 6 mm2, DCA cut length 280€6.57 instead of €7.30 new -10%
-
5 metres Zwart, 6 mm2, DCA cut length 281€6.57 instead of €7.30 new -10%
-
5 metres Zwart, 6 mm2, DCA cut length 282€6.57 instead of €7.30 new -10%
-
5 metres Zwart, 6 mm2, DCA cut length 283€6.57 instead of €7.30 new -10%
-
5 metres Zwart, 6 mm2, DCA cut length 284€6.57 instead of €7.30 new -10%
-
5 metres Zwart, 6 mm2, DCA cut length 285€6.57 instead of €7.30 new -10%
-
5 metres Zwart, 6 mm2, DCA cut length 286€6.57 instead of €7.30 new -10%
-
5 metres Zwart, 6 mm2, DCA cut length 287€6.57 instead of €7.30 new -10%
-
5 metres Zwart, 6 mm2, DCA cut length 288€6.57 instead of €7.30 new -10%
-
5 metres Zwart, 6 mm2, DCA cut length 289€6.57 instead of €7.30 new -10%
-
5 metres Zwart, 6 mm2, DCA cut length 290€6.57 instead of €7.30 new -10%
-
5 metres Zwart, 6 mm2, DCA cut length 291€6.57 instead of €7.30 new -10%
-
5 metres Zwart, 6 mm2, DCA cut length 292€6.57 instead of €7.30 new -10%
-
5 metres Zwart, 6 mm2, DCA cut length 293€6.57 instead of €7.30 new -10%
-
5 metres Zwart, 6 mm2, DCA cut length 294€6.57 instead of €7.30 new -10%
-
5 metres Zwart, 6 mm2, DCA cut length 295€6.57 instead of €7.30 new -10%
-
6 metres Zwart, 6 mm2, DCA cut length 162€7.88 instead of €8.76 new -10%
-
6 metres Zwart, 6 mm2, DCA cut length 188€7.88 instead of €8.76 new -10%
-
6 metres Zwart, 6 mm2, DCA cut length 229€7.88 instead of €8.76 new -10%
-
7 metres Zwart, 6 mm2, DCA cut length 137€9.20 instead of €10.22 new -10%
-
7,5 metres Zwart, 6 mm2, DCA cut length 226€9.86 instead of €10.95 new -10%
-
89 metres Zwart, 6 mm2, DCA cut length 140€116.95 instead of €129.94 new -10%

Solar cable is used to connect solar panels to the inverter. The cable has a UV-resistant sheath, so it stands up well to outdoor weather conditions.
The cable is available in red and black in various lengths and diameters. The colour of the cable has no effect on the current. To keep your set clear and organised, however, it is customary to use the red wire as the positive wire. To make the connection safe, you use MC-4 connectors. You crimp these connectors onto the cable using an MC4 crimping tool.
How does solar cable differ from ordinary installation wire?
A solar cable lies outdoors for years, on a roof, in full sun and at temperatures that can rise considerably on a dark roof. Ordinary installation wire is not made for that: the sheath hardens, cracks and eventually lets moisture through. Special solar cable has double insulation over tinned copper with a sheath that is UV-resistant, ozone-resistant and halogen-free, and that can handle a much wider temperature range.
On top of that, the DC side of an installation works with high voltage. A string of fifteen panels easily exceeds six hundred volts in winter without load. The insulation class of solar cable is designed for exactly that.
Choosing the right size
- 6 mm2 is the standard for residential installations and fits all common MC4 connectors.
- Calculate your string length. The longer the run, the greater the loss; with very long strings a larger cross-section pays off.
- Keep positive and negative separate. Use red and black, or mark the cores clearly. Mixing them up costs you an afternoon of searching.
- Avoid loops. Run positive and negative as close together as possible; large loops pick up induced voltage during lightning.
This solar cable is supplied per metre, so you order exactly what you need.
How many metres do you need?
Do not calculate your string length as the crow flies. The cable runs from the last panel across the roof, along the ridge or through a roof duct to the inside, and from there to the inverter. Add two cores per string to that: the positive and the negative both cover that route. A common rule of thumb is to take the measured route and add ten per cent for the bends, the branches and the slack you need to be able to crimp connectors.
Also bear in mind that you want some spare length at the inverter. If the inverter ever has to be moved half a metre for maintenance, a tightly stretched cable is the first thing in the way.
Crimping and connectors
MC4 connectors go on the ends. You crimp these with a special crimping tool that gives the correct hollow-profile shape; ordinary cable lug pliers flatten the sleeve and produce a connection with too much contact resistance. You do not notice that resistance straight away, but you do after a few years: the connection gets hot, oxidises and eventually fails. That is the best-known cause of burnt-out connectors on a roof.
Strip the solar cable to the length prescribed by the connector manufacturer, not by eye. Stripping too short means too little contact surface, stripping too long leaves bare copper sticking out of the sleeve.
What to watch out for during installation
- Do not let the cable lie on the roof surface. Clip it to the mounting rail with cable clips, so that it does not chafe and does not hang in a puddle of water.
- Do not pull cable over a sharp edge. At a roof duct, use a grommet or a duct with a rounded edge.
- Work carefully during the day. As soon as light falls on the panels, the solar cable is live. Only disconnect connectors when the inverter is switched off and the DC switch is open.
- Mark positive and negative at both ends, even if you use red and black. On a full roof, searching afterwards is time-consuming.
| Weight | 0.085 kg |
|---|---|
| Dimensions | 100 × 1.0 × 1.0 cm |
